系统环境:CentOS Linux release 7.4 (Core)
虚拟化:libvirt 3.2.0 版本
一、在webvirtmgr服务器(服务端)生成密钥
1.[root@kvm_master ~] cd /home
2.[root@kvm_master home] mkdir nginx #因为nginx用户在创建的时候是设置的sbin/nologin 所以这里需要手动创建家目录
3.[root@kvm_master home] chown nginx.nginx nginx/
4.[root@kvm_master home] chmod 700 nginx/ -R
5.[root@kvm_master home] su - nginx -s /bin/bash
6.-bash-4.2$ ssh-keygen ---期间输入yes后直接回车,回车
7.-bash-4.2$ touch ~/.ssh/config && echo -e "StrictHostKeyChecking=no\nUserKnownHostsFile=/dev/null" >> ~/.ssh/config
8.-bash-4.2$ chmod 0600 ~/.ssh/config
二、在kvm(受控端)服务器上配置webvirt用户
1.[root@kvm_10 home] useradd webvirtmgr
2.[root@kvm_10 home] echo "123456" | passwd --stdin webvirtmgr
3.[root@kvm_10 home] groupadd libvirt
4.[root@kvm_10 home] usermod -G libvirt -a webvirtmgr
三、在webvirtmgr服务器(服务端)上,将ssh-key上传到kvm服务器上
1.[root@kvm_master home] su - nginx -s /bin/bash
2.-bash-4.2$ ssh-copy-id webvirtmgr@192.168.0.2
四、在kvm(受控端)服务器上配置 libvirt ssh授权
1.[root@kvm_10 home] vim /etc/polkit-1/localauthority/50-local.d/50-libvirt-remote-access.pkla
2.[Remote libvirt SSH access]
3.Identity=unix-user:webvirtmgr
4.Action=org.libvirt.unix.manage
5.ResultAny=yes
6.ResultInactive=yes
7.ResultActive=yes
8.
9.[root@kvm_10 home] chown -R webvirtmgr.webvirtmgr /etc/polkit-1/localauthority/50-local.d/50-libvirt-remote-access.pkla
10.
11.重启 libvirtd 服务
12.[root@kvm_10 home] systemctl restart libvirtd
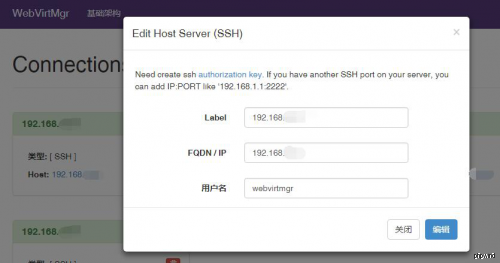
五、webvirtmgr 控制台中添加主机: